许多 亚马逊云科技 客户正在使用
GitLab
来满足他们的 DevOps 需求,包括源代码控制、持续集成和持续交付 (CI/CD)。我们的许多客户都在使用 GitLab SaaS(托管版),而其他客户则使用 GitLab 自我管理来满足他们的安全性和合规性要求。
客户可以轻松地将
运行器
添加到他们的 GitLab 实例中,以执行各种 CI/CD 作业。这些工作包括编译源代码、构建软件包或容器镜像、执行单元和集成测试等,甚至一直到生产部署。对于 SaaS 版本,GitLab 提供托管运行器,客户也可以提供自己的运行器。运行 GitLab 自行管理的客户必须提供自己的运行器。
在这篇文章中,我们将讨论客户如何通过使用亚马逊 Elasti
c Kubernetes 服务( 亚马逊 EK
S)管理 GitLab 运行器和执行器队列来最大限度地提高其 CI/CD 能力。 我们将利用 x86 和
Graviton
运行器,允许客户首次在 x86 和 亚马逊云科技 Graviton(我们最强大、最具成本效益和可持续的实例系列)上构建和测试他们的应用程序。按照 亚马逊云科技 “只按实际用量付费” 的理念,我们将尽可能缩小我们的
亚马逊弹性计算云 (Amazon EC2)
实例,并在竞价型实例上启动临时运行器。我们将演示在两种架构上构建和测试一个简单的演示应用程序。最后,我们将构建并交付一个可在亚马逊 EC2 实例或
亚马逊云科技
Fargate 上运行的多架构容器镜像,均可在 x86 和 Graviton 上运行。
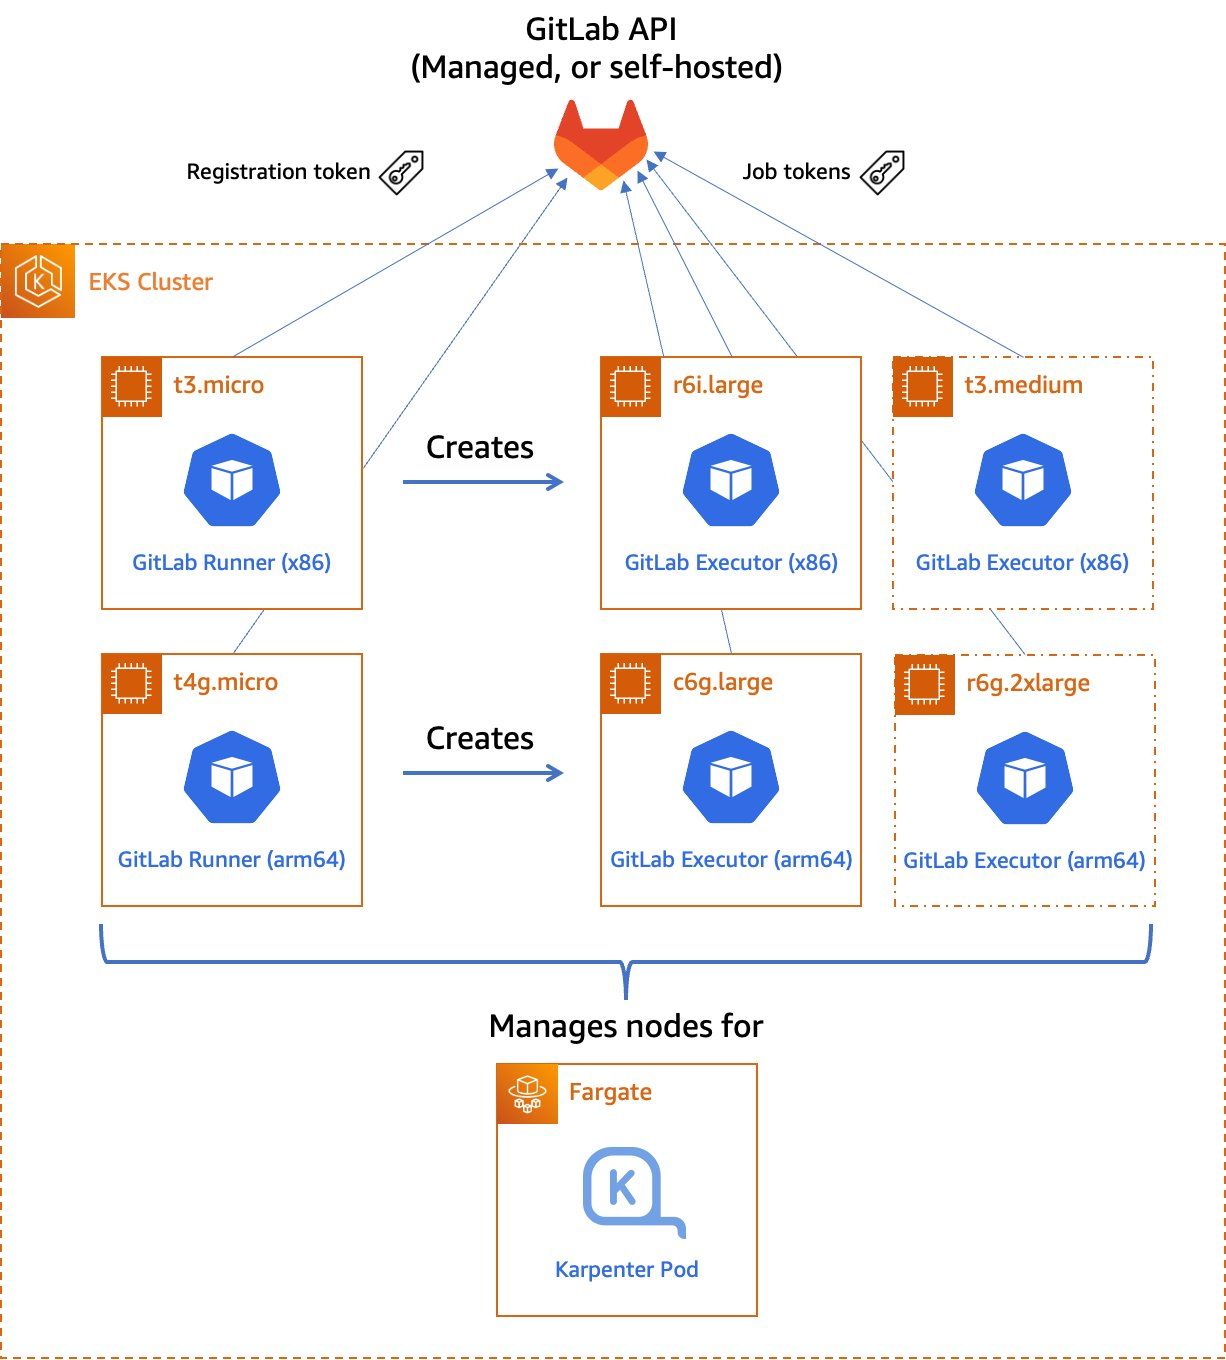
图 1。托管 GitLab 运行器架构概述。
让我们来看一下这些组件:
跑步者
运行
器 是 GitLab 向其发送在 CI/CD 管道中定义的作业的应用程序。运行器从 GitLab 接收任务并执行它们,可以自己执行,也可以将其传递给执行器(我们将在下一节中介绍执行器)。
在我们的设计中,我们将使用一对自托管的运行器。一个运行器将接受 x86 CPU 架构的作业,另一个运行器将接受 arm64(Graviton)CPU 架构的作业。为了帮助我们将任务路由到正确的运行器,我们将为每个运行器应用一些标签,指明它将负责的架构。
          我们将使用 x86 、

           x8


           6-64 和 amd64 来标记 x8


           6

          运行器 ,从而反映该架构中最常见的昵称,并将 arm64 运行器标记 arm64。
当前,这些运行器必须始终处于运行状态,这样他们才能在创建任务时接收作业。我们的运行器只需要少量的内存和 CPU,因此我们可以在小型 EC2 实例上运行它们以最大限度地降低成本。其中包括用于 Graviton 版本的 t4g.micro,或者用于 x86 版本的 t3.micro 或 t3a.micro。
为了为这些跑步者省钱,可以考虑 为他们购买
储蓄计划
或
预留实例
。与按需定价相比,储蓄计划和预留实例可以为您节省多达72%的费用,而且使用它们没有最低支出要求。
Kubernetes 执行者
在 GitLab CI/CD 中,
执行者
的工作 是执行实际构建。运行器可以根据需要创建数百或数千个执行器以满足当前需求,但要遵守
您指定的并 发限制
。 执行器仅在需要时创建,而且它们是短暂的:作业在执行器上完成运行后,运行器将终止它。
在我们的设计中,我们将使用 GitLab 运行器中内置的
Kubernetes 执行器
。Kubernetes 执行器只需调度一个新的 pod 来运行每个作业。任务完成后,Pod 将终止,从而腾出节点来运行其他作业。
Kubernetes 执行器是高度可定制的。
我们将为每个运行器配置一个 n
odeSelector
,确保仅将任务调度到运行指定 CPU 架构的节点上。其他可能的自定义设置包括 CPU 和内存预留、节点和 Pod 容差、服务帐户、容量挂载等。
扩展工作节点
对于大多数客户来说,CI/CD 任务不太可能一直运行。为了节省成本,我们只想在有任务要运行时运行工作节点。
为了实现这一目标,我们将求助
Karpenter
。Karpenter 会在需要时尽快配置 EC2 实例以适应新调度的 pod。如果计划了一个新的执行器 Pod,但没有一个合格的实例上有足够的剩余容量,则 Karpenter 将快速自动启动一个适合该 Pod 的新实例。Karpenter 还将定期扫描集群并终止空闲节点,从而节省成本。Karpenter 可以在短短 30 秒内终止一个空置节点。
Karpenter 可以 根据您的需求启动亚马逊 EC2 按需
实例或 竞价型实例
。使用竞价型实例,与按需实例价格相比,您最多可以节省 90% 的费用。由于 CI/CD 任务通常对时间不敏感,竞价型实例可能是 GitLab 执行舱的绝佳选择。Karpenter 甚至会自动找到最佳竞价型实例类型,以加快启动实例所需的时间并最大限度地减少作业中断的可能性。
部署我们的解决方案
为了部署我们的解决方案,我们将使用
亚马逊云科技 云开发套件 (亚马逊云科技 CDK) 和 EKS
蓝图
库编写一个小型应用程序。 亚马逊云科技 CDK 是一个开源软件开发框架,可使用熟悉的编程语言定义您的云应用程序资源。EKS 蓝图是一个库,旨在使用最少的编码轻松地将复杂的 Kubernetes 资源部署到 Amazon EKS 集群。
高级基础设施代码(可以在我们的
GitLab 存储库
中找到)非常 简单。我添加了评论以解释其工作原理。
// All CDK applications start with a new cdk.App object.
const app = new cdk.App();

// Create a new EKS cluster at v1.23. Run all non-DaemonSet pods in the
// `kube-system` (coredns, etc.) and `karpenter` namespaces in Fargate
// so that we don't have to maintain EC2 instances for them.
const clusterProvider = new blueprints.GenericClusterProvider({
  version: KubernetesVersion.V1_23,
  fargateProfiles: {
    main: {
      selectors: [
        { namespace: 'kube-system' },
        { namespace: 'karpenter' },
      ]
    }
  },
  clusterLogging: [
    ClusterLoggingTypes.API,
    ClusterLoggingTypes.AUDIT,
    ClusterLoggingTypes.AUTHENTICATOR,
    ClusterLoggingTypes.CONTROLLER_MANAGER,
    ClusterLoggingTypes.SCHEDULER
  ]
});

// EKS Blueprints uses a Builder pattern.
blueprints.EksBlueprint.builder()
  .clusterProvider(clusterProvider) // start with the Cluster Provider
  .addOns(
    // Use the EKS add-ons that manage coredns and the VPC CNI plugin
    new blueprints.addons.CoreDnsAddOn('v1.8.7-eksbuild.3'),
    new blueprints.addons.VpcCniAddOn('v1.12.0-eksbuild.1'),
    // Install Karpenter
    new blueprints.addons.KarpenterAddOn({
      provisionerSpecs: {
        // Karpenter examines scheduled pods for the following labels
        // in their `nodeSelector` or `nodeAffinity` rules and routes
        // the pods to the node with the best fit, provisioning a new
        // node if necessary to meet the requirements.
        //
        // Allow either amd64 or arm64 nodes to be provisioned
        'kubernetes.io/arch': ['amd64', 'arm64'],
        // Allow either Spot or On-Demand nodes to be provisioned
        'karpenter.sh/capacity-type': ['spot', 'on-demand']
      },
      // Launch instances in the VPC private subnets
      subnetTags: {
        Name: 'gitlab-runner-eks-demo/gitlab-runner-eks-demo-vpc/PrivateSubnet*'
      },
      // Apply security groups that match the following tags to the launched instances
      securityGroupTags: {
        'kubernetes.io/cluster/gitlab-runner-eks-demo': 'owned'
      }
    }),
    // Create a pair of a new GitLab runner deployments, one running on
    // arm64 (Graviton) instance, the other on an x86_64 instance.
    // We'll show the definition of the GitLabRunner class below.
    new GitLabRunner({
      arch: CpuArch.ARM_64,
      // If you're using an on-premise GitLab installation, you'll want
      // to change the URL below.
      gitlabUrl: 'https://gitlab.com',
      // Kubernetes Secret containing the runner registration token
      // (discussed later)
      secretName: 'gitlab-runner-secret'
    }),
    new GitLabRunner({
      arch: CpuArch.X86_64,
      gitlabUrl: 'https://gitlab.com',
      secretName: 'gitlab-runner-secret'
    }),
  )
  .build(app,
         // Stack name
         'gitlab-runner-eks-demo');
GitLabRunner 类是一个 Helmaddon 子类,它从顶级应用程序中获取一些参数:
// The location and name of the GitLab Runner Helm chart
const CHART_REPO = 'https://charts.gitlab.io';
const HELM_CHART = 'gitlab-runner';

// The default namespace for the runner
const DEFAULT_NAMESPACE = 'gitlab';

// The default Helm chart version
const DEFAULT_VERSION = '0.40.1';

export enum CpuArch {
    ARM_64 = 'arm64',
    X86_64 = 'amd64'
}

// Configuration parameters
interface GitLabRunnerProps {
    // The CPU architecture of the node on which the runner pod will reside
    arch: CpuArch
    // The GitLab API URL
    gitlabUrl: string
    // Kubernetes Secret containing the runner registration token (discussed later)
    secretName: string
    // Optional tags for the runner. These will be added to the default list
    // corresponding to the runner's CPU architecture.
    tags?: string[]
    // Optional Kubernetes namespace in which the runner will be installed
    namespace?: string
    // Optional Helm chart version
    chartVersion?: string
}

export class GitLabRunner extends HelmAddOn {
    private arch: CpuArch;
    private gitlabUrl: string;
    private secretName: string;
    private tags: string[] = [];

    constructor(props: GitLabRunnerProps) {
        // Invoke the superclass (HelmAddOn) constructor
        super({
            name: `gitlab-runner-${props.arch}`,
            chart: HELM_CHART,
            repository: CHART_REPO,
            namespace: props.namespace || DEFAULT_NAMESPACE,
            version: props.chartVersion || DEFAULT_VERSION,
            release: `gitlab-runner-${props.arch}`,
        });

        this.arch = props.arch;
        this.gitlabUrl = props.gitlabUrl;
        this.secretName = props.secretName;

        // Set default runner tags
        switch (this.arch) {
            case CpuArch.X86_64:
                this.tags.push('amd64', 'x86', 'x86-64', 'x86_64');
                break;
            case CpuArch.ARM_64:
                this.tags.push('arm64');
                break;
        }
        this.tags.push(...props.tags || []); // Add any custom tags
    };

    // `deploy` method required by the abstract class definition. Our implementation
    // simply installs a Helm chart to the cluster with the proper values.
    deploy(clusterInfo: ClusterInfo): void | Promise<Construct> {
        const chart = this.addHelmChart(clusterInfo, this.getValues(), true);
        return Promise.resolve(chart);
    }

    // Returns the values for the GitLab Runner Helm chart
    private getValues(): Values {
        return {
            gitlabUrl: this.gitlabUrl,
            runners: {
                config: this.runnerConfig(), // runner config.toml file, from below
                name: `demo-runner-${this.arch}`, // name as seen in GitLab UI
                tags: uniq(this.tags).join(','),
                secret: this.secretName, // see below
            },
            // Labels to constrain the nodes where this runner can be placed
            nodeSelector: {
                'kubernetes.io/arch': this.arch,
                'karpenter.sh/capacity-type': 'on-demand'
            },
            // Default pod label
            podLabels: {
                'gitlab-role': 'manager'
            },
            // Create all the necessary RBAC resources including the ServiceAccount
            rbac: {
                create: true
            },
            // Required resources (memory/CPU) for the runner pod. The runner
            // is fairly lightweight as it's a self-contained Golang app.
            resources: {
                requests: {
                    memory: '128Mi',
                    cpu: '256m'
                }
            }
        };
    }

    // This string contains the runner's `config.toml` file including the
    // Kubernetes executor's configuration. Note the nodeSelector constraints
    // (including the use of Spot capacity and the CPU architecture).
    private runnerConfig(): string {
        return `
  [[runners]]
    [runners.kubernetes]
      namespace = "{{.Release.Namespace}}"
      image = "ubuntu:16.04"
    [runners.kubernetes.node_selector]
      "kubernetes.io/arch" = "${this.arch}"
      "kubernetes.io/os" = "linux"
      "karpenter.sh/capacity-type" = "spot"
    [runners.kubernetes.pod_labels]
      gitlab-role = "runner"
      `.trim();
    }
}
出于安全原因,我们将 GitLab 注册令牌存储在 Kubernetes 密钥中,而不是存储在我们的源代码中。为了提高安全性,我们建议使用
您在创建 Amazon EK
S 集群 时通过 指定加密配置提供的 亚马逊云科技 密钥管理服务 (亚马逊云科技 KMS)
密钥来加密密钥
。通过
Kubernetes
RBAC 规则限制对这个密钥的访问是一种很好的做法。
要创建密钥,请运行以下命令:
# These two values must match the parameters supplied to the GitLabRunner constructor
NAMESPACE=gitlab
SECRET_NAME=gitlab-runner-secret
# The value of the registration token.
TOKEN=GRxxxxxxxxxxxxxxxxxxxxxx

kubectl -n $NAMESPACE create secret generic $SECRET_NAME \
        --from-literal="runner-registration-token=$TOKEN" \
        --from-literal="runner-token="
构建多架构容器镜像
现在我们已经启动了 GitLab 运行器并配置了执行器,我们可以构建和测试一个简单的多架构容器镜像。如果测试通过,我们可以将其上传到我们项目的 GitLab 容器注册表。我们的应用程序将非常简单:我们将在 Go 中创建一个只打印出 “Hello World” 并打印出当前架构的 Web 服务器。
在我们的
GitLab
存储库中查找示例应用程序的源代码。
在 GitLab 中,CI/CD 配置存在于源存储库根目录下的
.gitlab-ci.yml
文件中。在此文件中,我们声明了有序构建阶段的列表,然后声明了与每个阶段相关的特定作业。
我们的阶段是:
-
在
构建阶段
,我们编译代码,生成特定架构的镜像,并将这些映像上传到 GitLab 容器注册表。这些上传的图像带有后缀,表示它们所依据的架构。此作业使用矩阵变量将其与两个不同的运行器并行运行——每个支持的架构各一个。此外,我们不是使用
docker build
来生成我们的图像,而是使用 Kaniko 来构建它们。这使我们能够在非特权容器环境中构建镜像,并大大改善安全状况。
-
测试阶段
,我们测试代码。与构建阶段一样,我们使用矩阵变量在每个支持的架构上的不同容器中并行运行测试。
装配
阶段
,在此阶段,我们根据两个架构特定的映像创建多架构映像清单。然后,我们将清单推送到映像注册表中,以便在将来的部署中可以参考它。
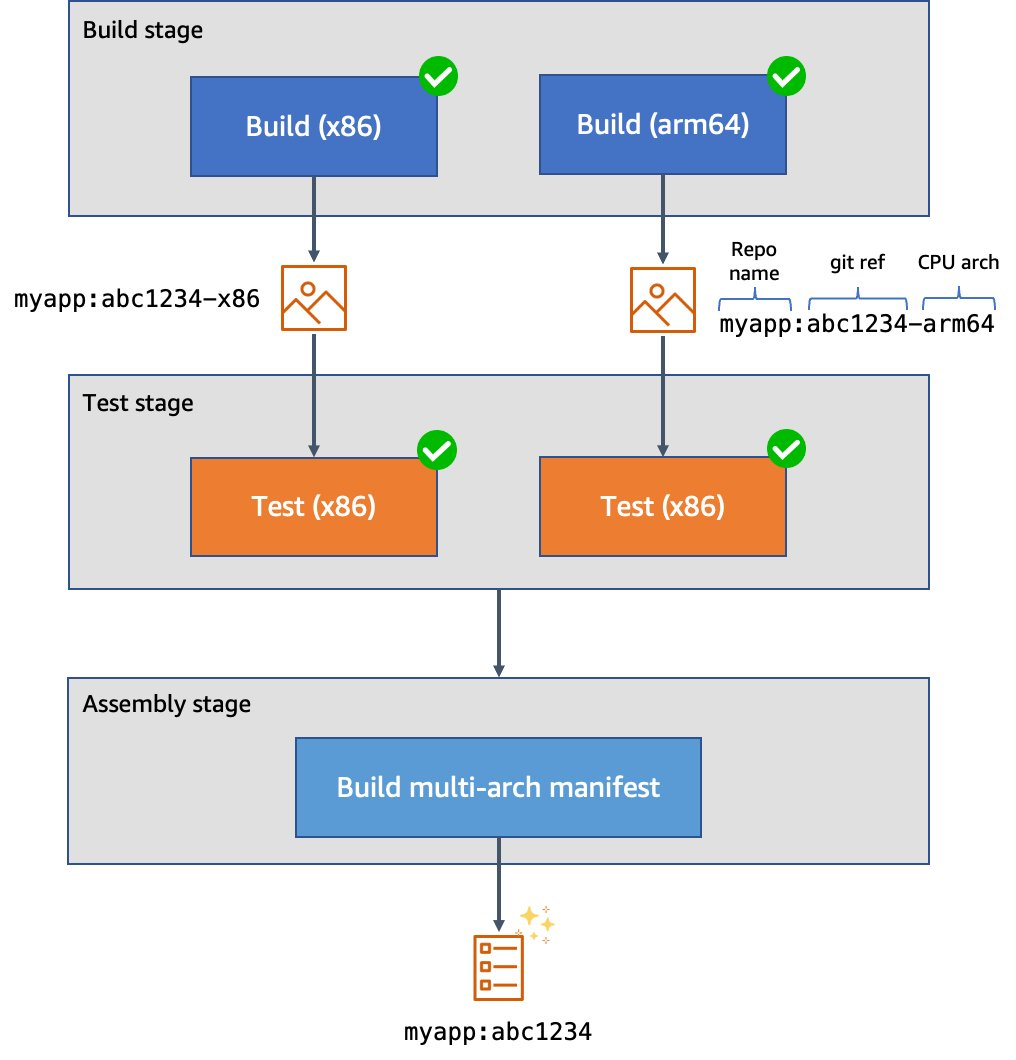
图 2。多架构映像的 CI/CD 管道示例。
以下是我们的顶级配置的样子:
variables:
  # These are used by the runner to configure the Kubernetes executor, and define
  # the values of spec.containers[].resources.limits.{memory,cpu} for the Pod(s).
  KUBERNETES_MEMORY_REQUEST: 1Gi
  KUBERNETES_CPU_REQUEST: 1

# List of stages for jobs, and their order of execution
stages:
  - build
  - test
  - create-multiarch-manifest
Here’s what our build stage job looks like. Note the matrix of variables which are set in BUILD_ARCH as the two jobs are run in parallel:
build-job:
  stage: build
  parallel:
    matrix:              # This job is run twice, once on amd64 (x86), once on arm64
    - BUILD_ARCH: amd64
    - BUILD_ARCH: arm64
  tags: [$BUILD_ARCH]    # Associate the job with the appropriate runner
  image:
    name: gcr.io/kaniko-project/executor:debug
    entrypoint: [""]
  script:
    - mkdir -p /kaniko/.docker
    # Configure authentication data for Kaniko so it can push to the
    # GitLab container registry
    - echo "{\"auths\":{\"${CI_REGISTRY}\":{\"auth\":\"$(printf "%s:%s" "${CI_REGISTRY_USER}" "${CI_REGISTRY_PASSWORD}" | base64 | tr -d '\n')\"}}}" > /kaniko/.docker/config.json
    # Build the image and push to the registry. In this stage, we append the build
    # architecture as a tag suffix.
    - >-
      /kaniko/executor
      --context "${CI_PROJECT_DIR}"
      --dockerfile "${CI_PROJECT_DIR}/Dockerfile"
      --destination "${CI_REGISTRY_IMAGE}:${CI_COMMIT_SHORT_SHA}-${BUILD_ARCH}"
以下是我们的测试阶段工作是什么样子。这次我们使用刚才生成的图像。我们的源代码被复制到应用程序容器中。然后,我们可以运行 make
test-api
来执行服务器测试套件。
build-job:
  stage: build
  parallel:
    matrix:              # This job is run twice, once on amd64 (x86), once on arm64
    - BUILD_ARCH: amd64
    - BUILD_ARCH: arm64
  tags: [$BUILD_ARCH]    # Associate the job with the appropriate runner
  image:
    # Use the image we just built
    name: "${CI_REGISTRY_IMAGE}:${CI_COMMIT_SHORT_SHA}-${BUILD_ARCH}"
  script:
    - make test-container
最后,这是我们的装配阶段的样子。我们使用
Podman
来构建多架构清单并将其推送到映像注册表中。传统上,我们可能会使用
docker buildx
来执行此操作,但是使用 Podman 可以让我们在非特权容器中完成这项工作,以提高安全性。
create-manifest-job:
  stage: create-multiarch-manifest
  tags: [arm64]
  image: public.ecr.aws/docker/library/fedora:36
  script:
    - yum -y install podman
    - echo "${CI_REGISTRY_PASSWORD}" | podman login -u "${CI_REGISTRY_USER}" --password-stdin "${CI_REGISTRY}"
    - COMPOSITE_IMAGE=${CI_REGISTRY_IMAGE}:${CI_COMMIT_SHORT_SHA}
    - podman manifest create ${COMPOSITE_IMAGE}
    - >-
      for arch in arm64 amd64; do
        podman manifest add ${COMPOSITE_IMAGE} docker://${COMPOSITE_IMAGE}-${arch};
      done
    - podman manifest inspect ${COMPOSITE_IMAGE}
    # The composite image manifest omits the architecture from the tag suffix.
    - podman manifest push ${COMPOSITE_IMAGE} docker://${COMPOSITE_IMAGE}
试试看
我创建了一个包含示例源代码的公共测试 GitLab 项目,并将运行器附加到该项目中。我们可以在
“设置” > “CI/CD” > “运行器” 中看到它们:
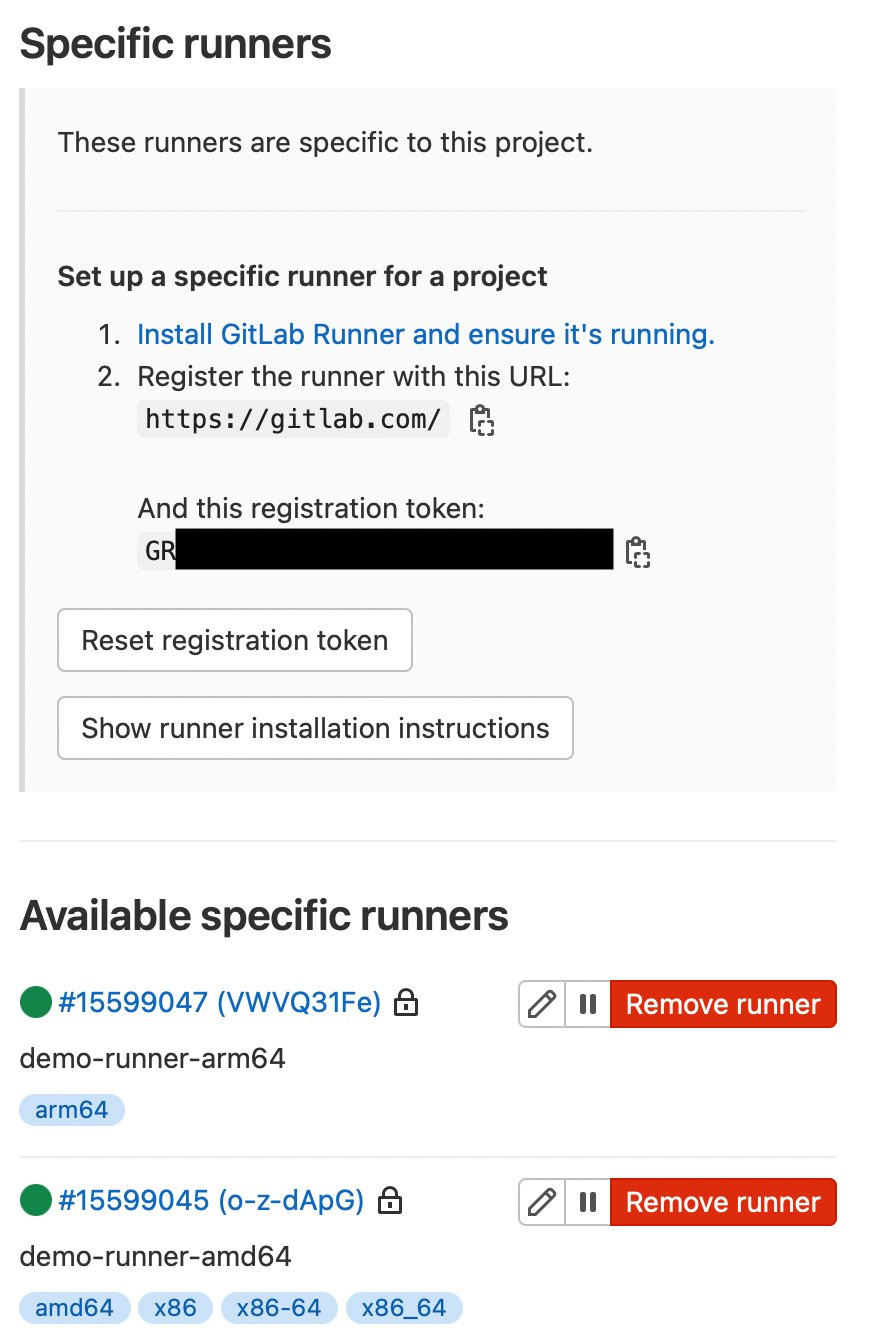
图 3。GitLab 运行器配置。
在这里,我们还可以看到一些管道的执行,其中一些成功了,有些失败了。
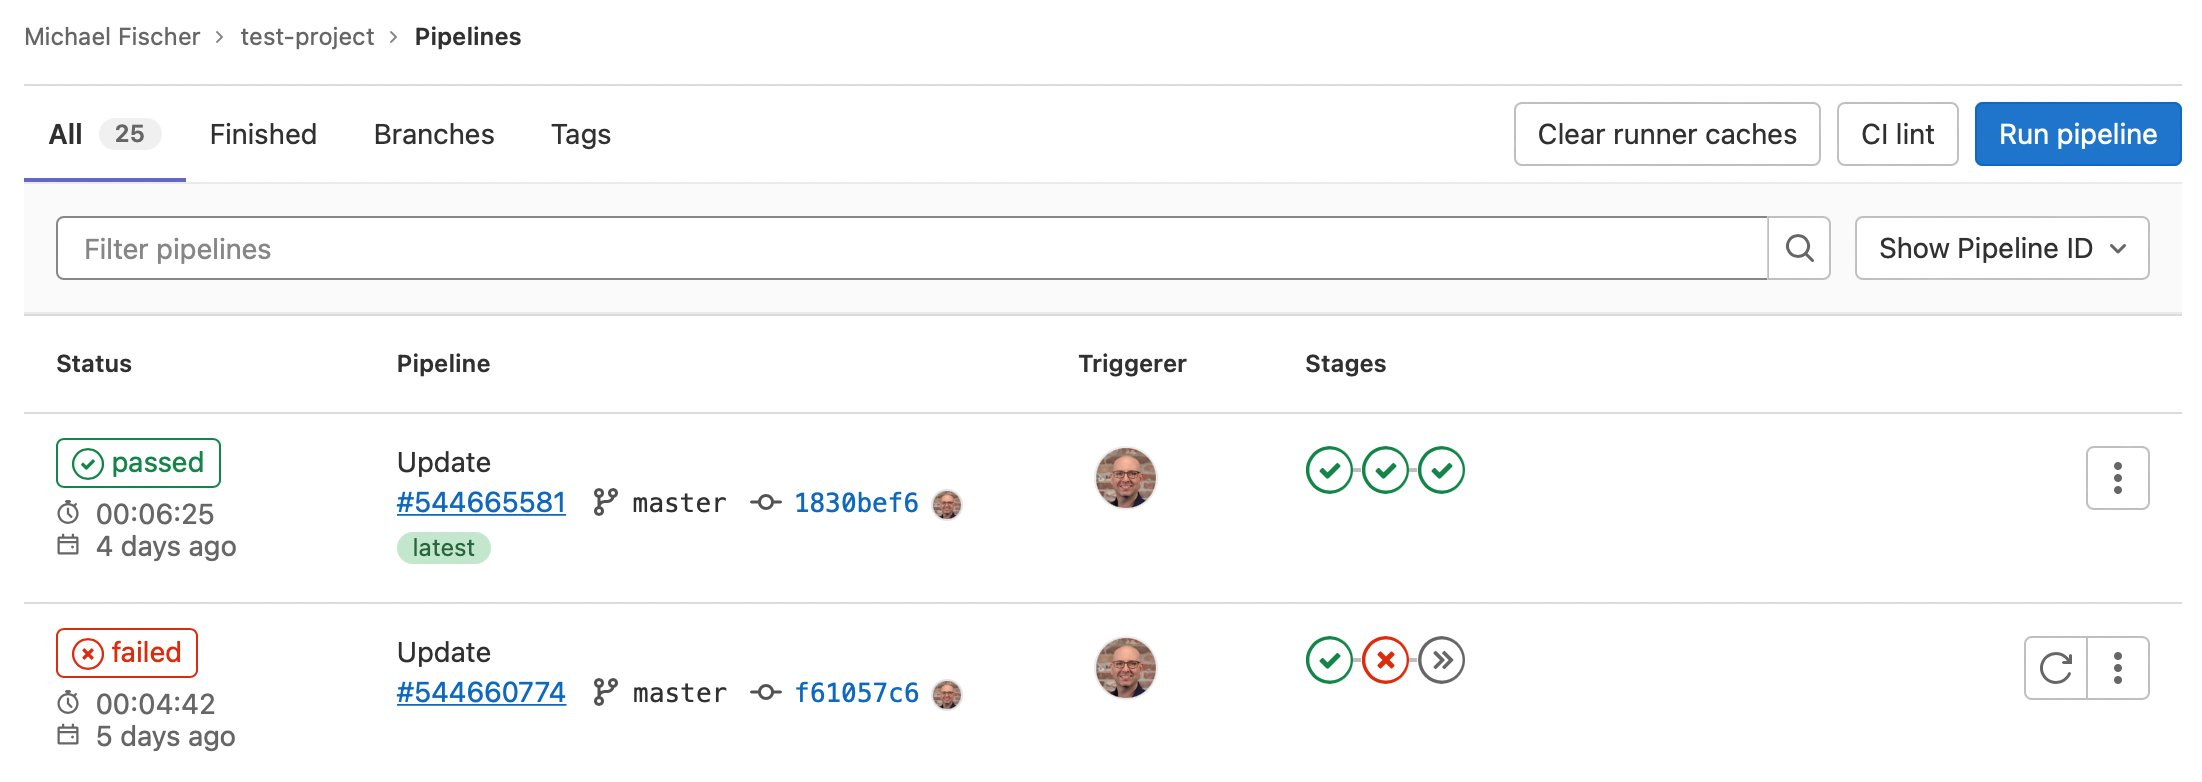
图 4。GitLab 流水线执行示例。
我们还可以看到与管道执行相关的特定任务:
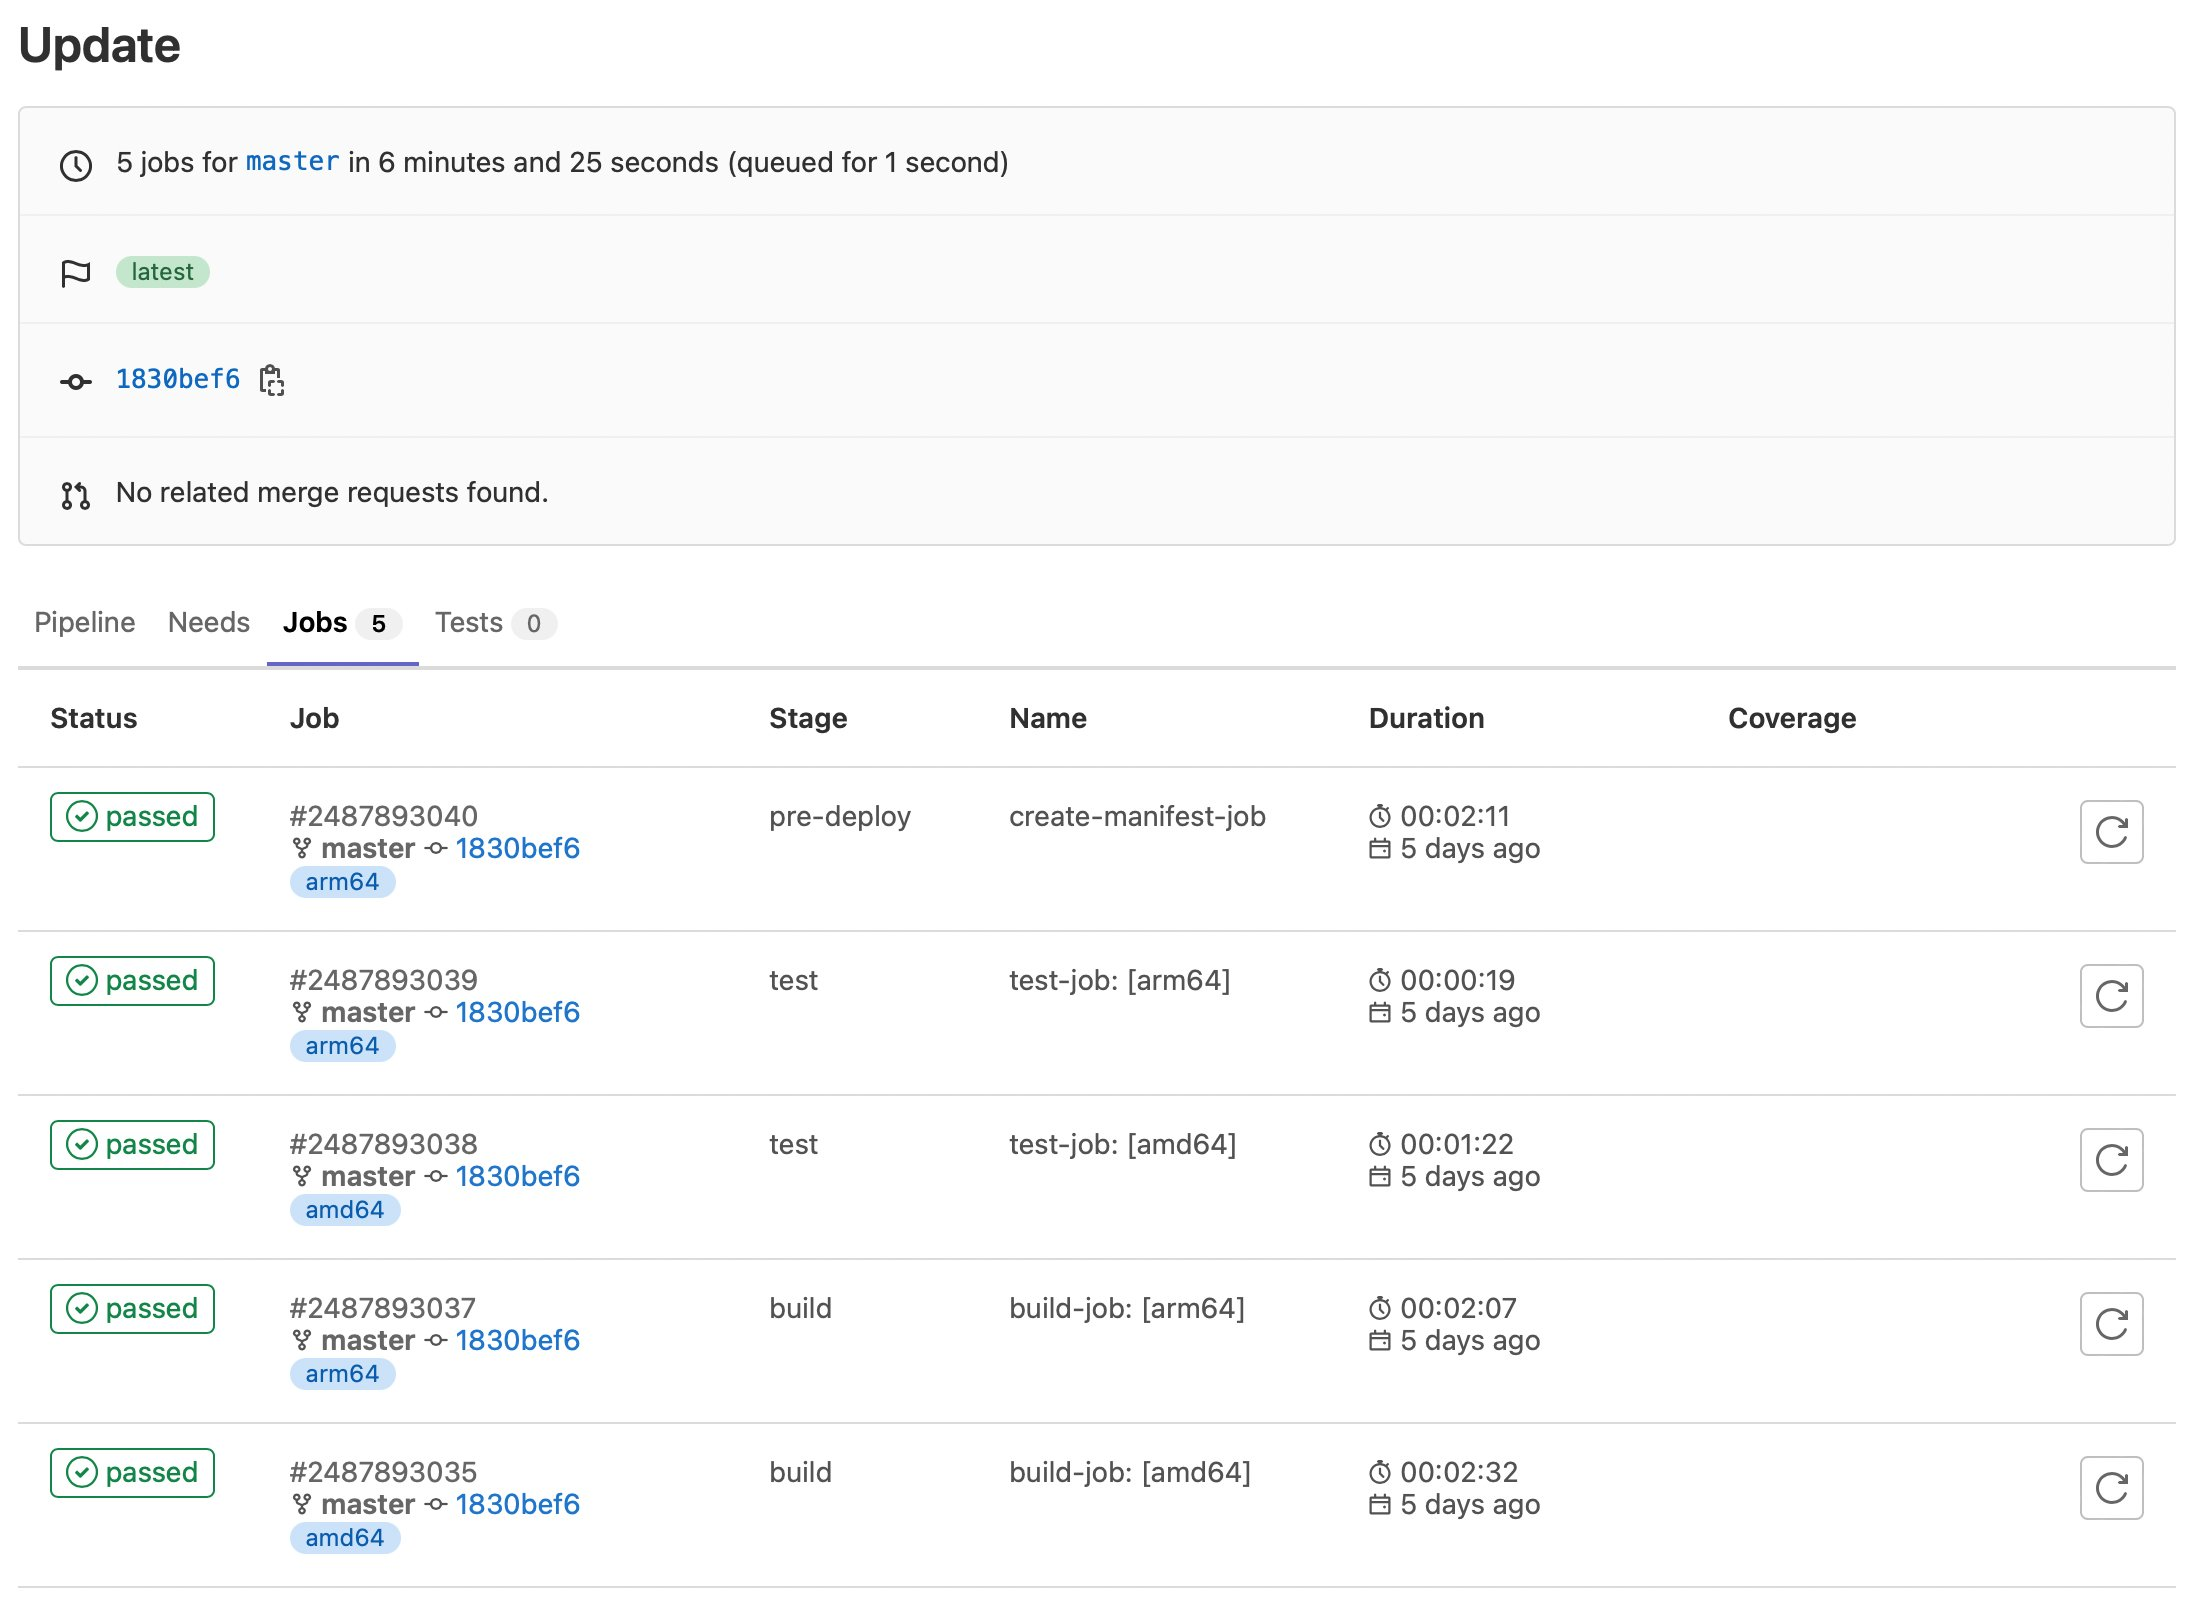
图 5。GitLab 示例任务执行情况。
最后,这是我们的容器镜像:
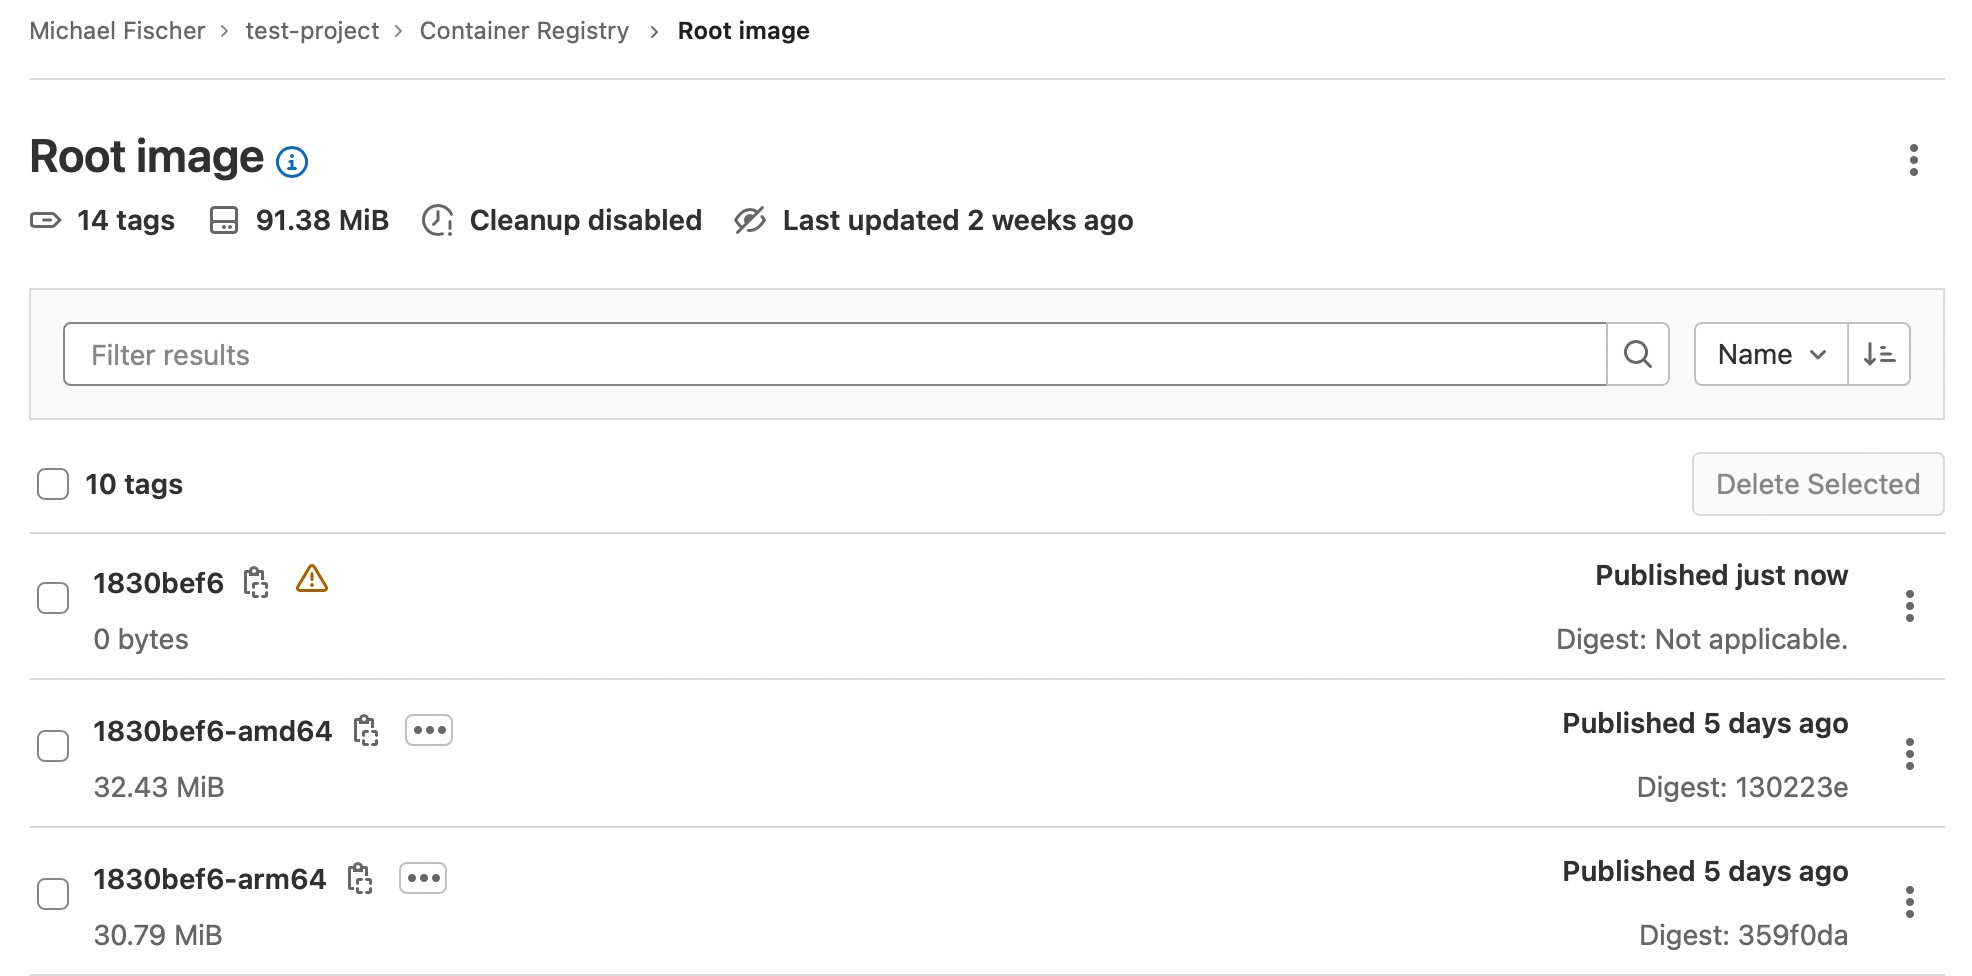
图 6。GitLab 示例容器注册表。
结论
在这篇文章中,我们说明了如何使用 x86 和 Graviton 实例系列,使用 GitLab、亚马逊 EKS、Karpenter 和亚马逊 EC2 快速轻松地构建多架构容器镜像。我们对使用尽可能多的托管服务、最大限度地提高安全性、最大限度地降低复杂性和总拥有成本进行了索引。我们深入探讨了流程的多个方面,并讨论了如何通过使用竞价型实例执行 CI/CD 来节省高达 90% 的解决方案成本。
在我们的
GitLab
存储库中查找示例代码,包括今天显示的所有内容。
构建多架构映像将解锁在 亚马逊云科技 Graviton 上运行应用程序的价值和性能,并提高计算选择的灵活性。我们鼓励您今天就开始。
作者简介: