We use machine learning technology to do auto-translation. Click "English" on top navigation bar to check Chinese version.
Scale from 100 to 10,000 pods on Amazon EKS
This post was co-authored by Nikhil Sharma and Ravishen Jain of OLX Autos
Introduction
We, at OLX Autos run more than 100 non-production (non-prod) environments in parallel for different use-cases on home grown Internal Developer Platform (IDP), ORION. ORION runs on Amazon
In this post , we show you how we scaled host Amazon EKS cluster for ORION from 100 to more than 10,000 pods.
About OLX Autos
OLX Autos IDP – Orion
Our tech team has built a platform, ROADSTER, that hosts multiple business streams on it like Car Transaction, Financing, and Classifieds. Considering the ever changing, highly competitive nature of the automobile market, the key principles behind the platform are blazing speed, modularity, resilience, and a focus on cutting edge technology. Roadster is hosted on Amazon EKS.
As we scale, rapid delivery of new features remains a key challenge. Reducing complexity for engineers and enhancing their efficiency is one of the primary goals that we focus on. Our engineers have to create multiple non-prod Roadster environments for different use-cases. The use-cases range from showcasing an experimental feature demonstration, running automation test cases to launching Roadster in a new market. A Roadster environment needs multiple micro-services and databases which interact with each other for a business use case.
Creation and maintenance of an environment was time and resource consuming. We addressed this challenge by building an Internal Developer Platform (IDP), ORION, that provides a central platform that addresses problems of creation of a new Roadster environment.
Solution overview
The following diagram shows the architecture of ORION:
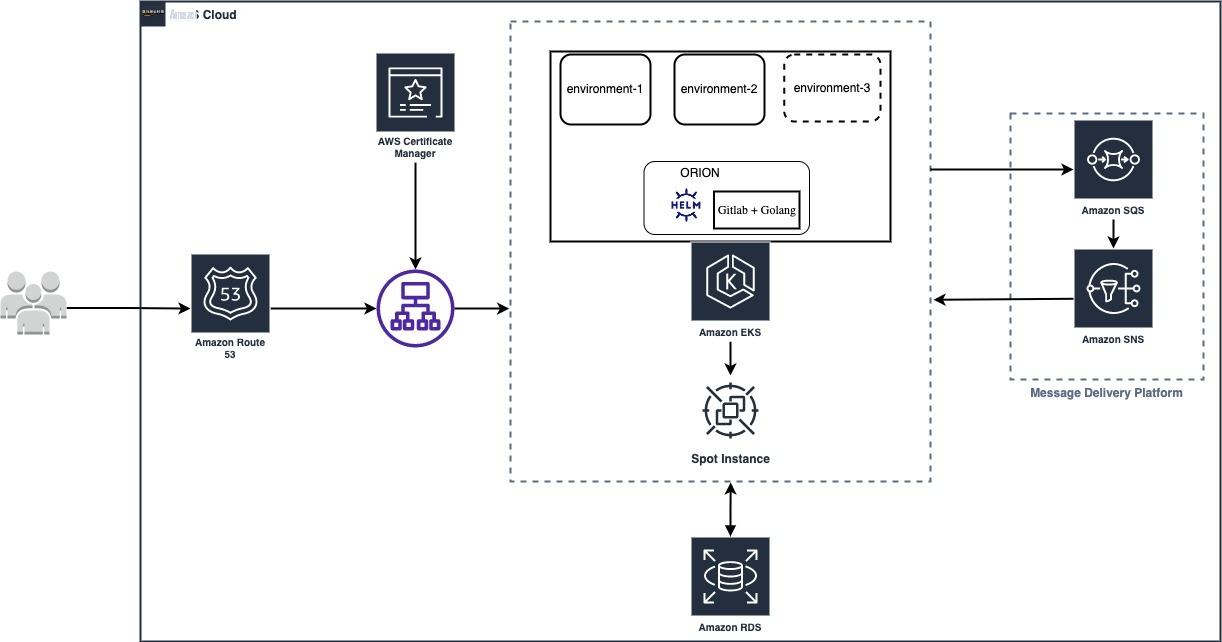
ORION aims to:
- Reduce complexity and focus on a great developer experience by providing seamless integration of services, tools, documentation, and insights.
- Remove dependency on other teams by enabling developers to create a Roadster platform with minimal clicks.
One of the key features of ORION is to provision a Roadster environment with a few clicks.
Using Amazon EKS for IDP
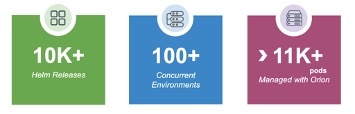
Roadster is completely containerized and has run on Amazon EKS for years. For ORION, Amazon EKS was an obvious choice. ORION enables creation of a new Roadster environment. Using ORION, we are supporting more than 100 concurrent environments on a single Amazon EKS cluster.
The following diagram shows the scale ORION handles on an Amazon EKS cluster:
Walkthrough of scaling challenges and resolution
As the adoption of ORION increased within our team, it presented multiple interesting scaling challenges.
High latency for DNS resolution
Classic ndots challenge
Default ndot value in Amazon EKS is 5. As per DNS standards, a domain name is considered a fully qualified domain name (FQDN) if it has number of dots(.) equal to ndot value or if it has a dot(.) in the end. On a DNS query for a domain name which is not a FQDN, core-dns iterates through all search paths until it finds success.
If you query for amazon.com from a pod , then the core-dns queries for:
[amazon.com.default.svc.cluster.local,
amazon.com.svc.cluster.local,
amazon.com.cluster.local,
amazon.com.]
in this order, until it succeeds.
We executed nslookup on amazon.com from a node on Amazon EKS cluster, which resulted in 7 DNS questions (5 false DNS queries, 1 ipv4, 1ipv6 DNS query).
The following screenshot shows the output of the nslookup command on amazon.com. The count of grep QUESTIONS shows the number of DNS queries and the count of grep NXDOMAIN shows the number of errors due to false DNS queries:
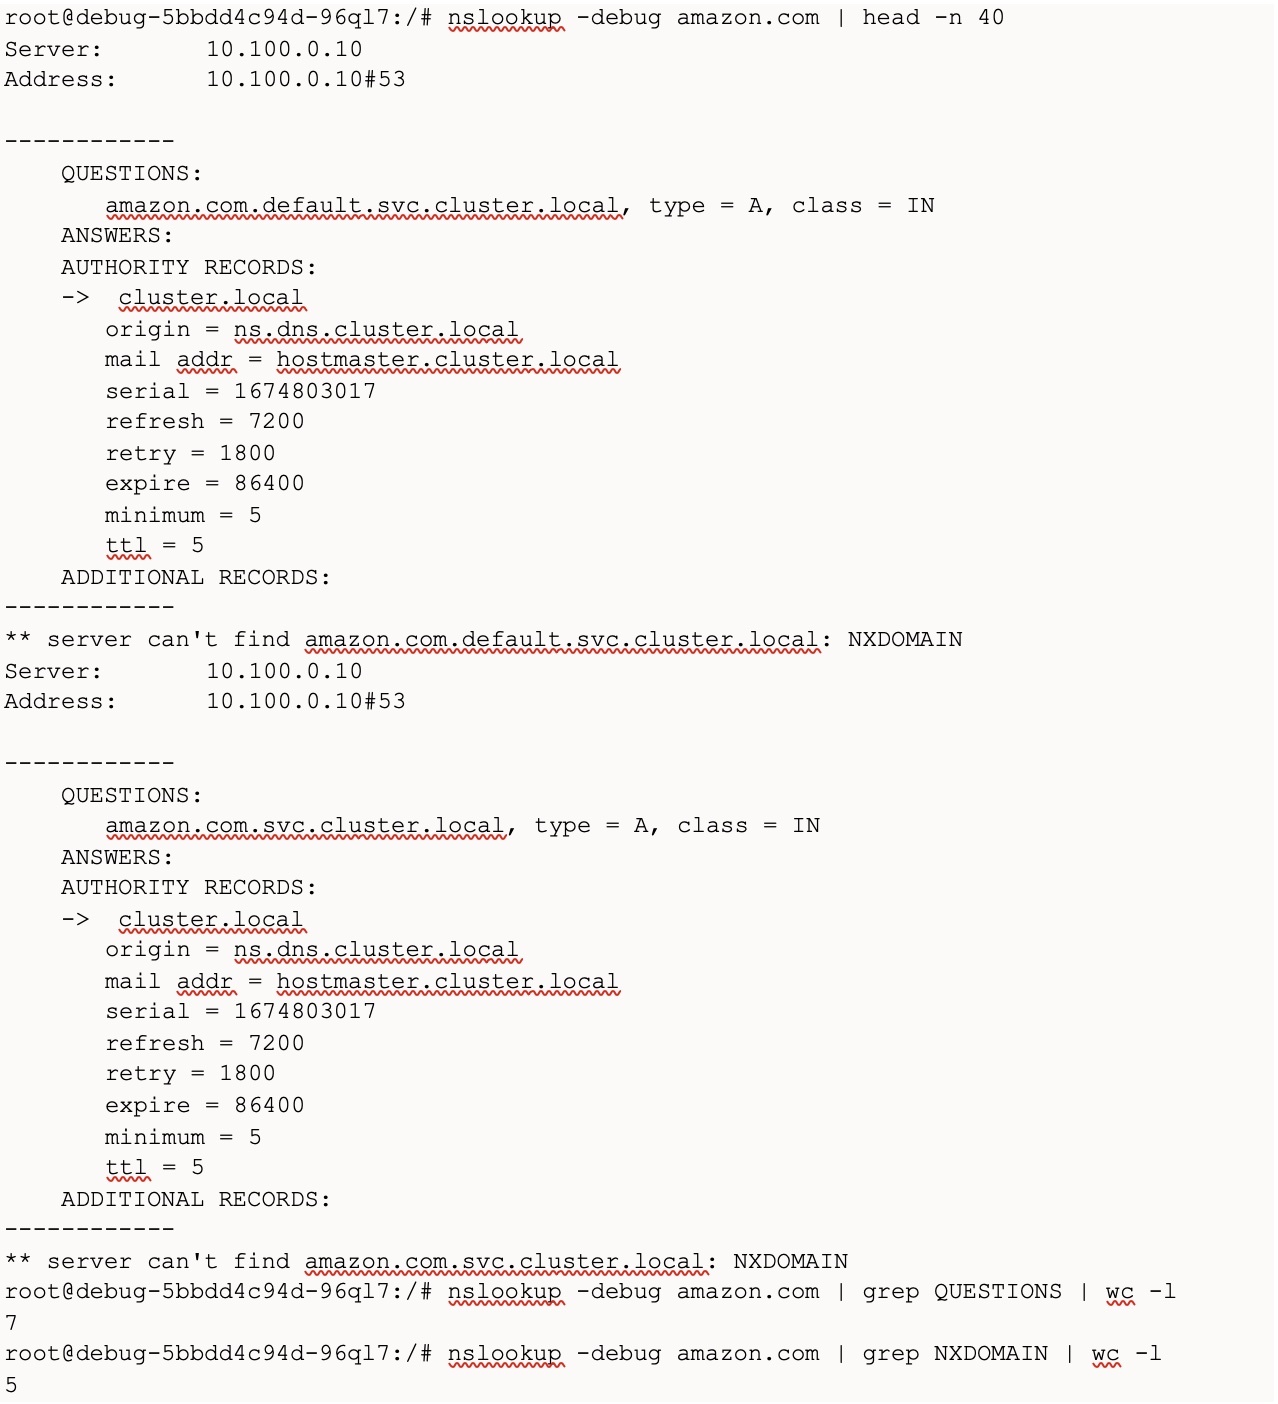
As the scale of OLX Autos increased, network calls from inter-service communication increased many times. This resulted in a large number of DNS queries. The ndot value of 5 exacerbated the issue 5 times, resulting in crashing of core-dns and hence frequent DNS resolution errors. This
High response time due to CPU throttling
Initially we set
Resolution by appending a dot in the end
Appending one dot in the DNS name makes it a FQDN and the resolver isn’t required to iterate through the search path. This reduces the number of DNS calls.
We executed nslookup on “amazon.com.” (i.e., appended a dot to the end). This reduced the DNS questions from 7 to 2 with 0 NXDOMAIN errors. This reduced more than 70% queries on our core-dns servers and improved performance.
The following screenshot show the output of the nslookup command on “amazon.com.” after the changes above:
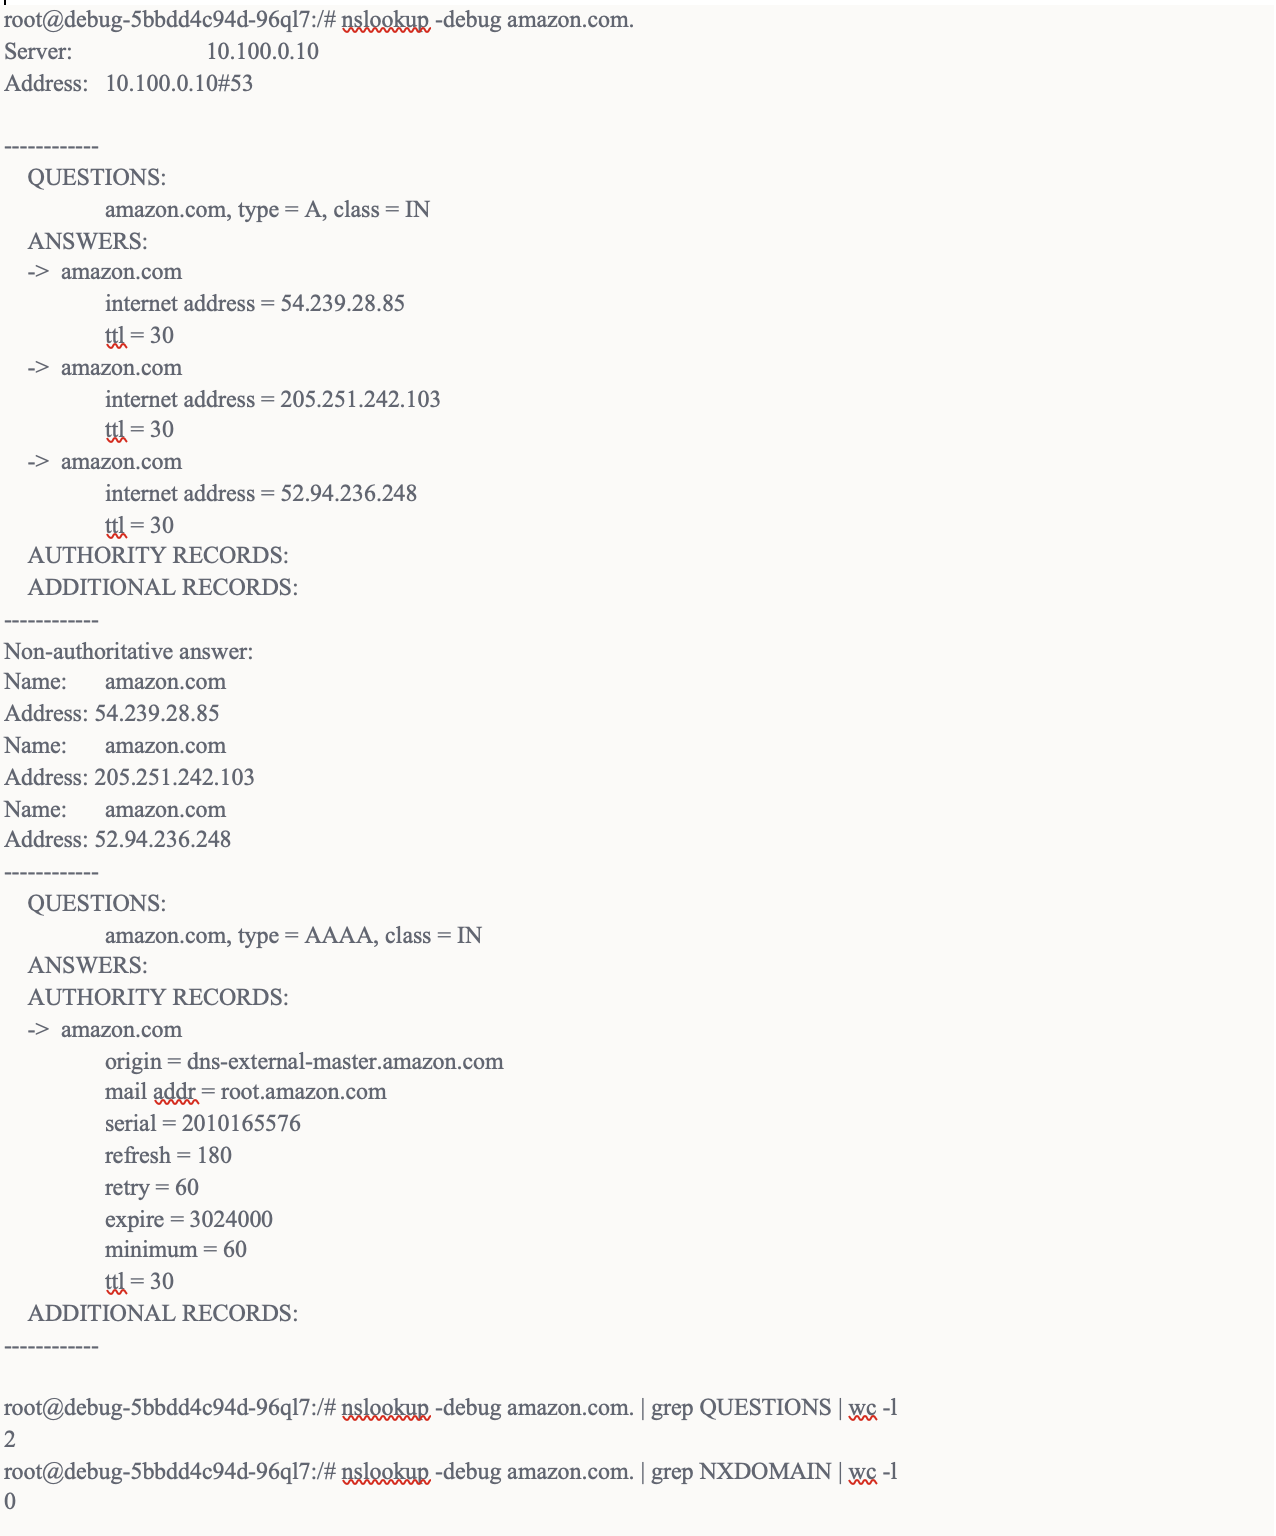
The http calls endpoints we were calling were configured through environment variables. We appended a dot at the end of those HTTP endpoints in environment variables.
DNS caching for further improvement
The above change reduced a significant amount of DNS queries on core-dns servers; however, as OLX Autos scale, we still ran a lot of DNS queries resulting in higher latency. We rolled out
The following diagram shows application response time with and without DNS caching:

IP starvation and VPC CNI plugin
The number of IPs depends on the instance type of the node. For a detailed list of the IP address per network per interface type, please refer to this
This implies that for every node of type c5.9xlarge, it reserves 58 IPs (i.e., 29 on each ENI) from the VPC pool, even if no pods are running on that worker node.
The default configuration led to IP starvation in our VPC and resulted in failure to add more nodes to the Amazon EKS cluster. It also resulted in failure to launch new Amazon Web Services resources in VPC like Amazon
The default behaviour of VPC CNI plugin could be configured through following parameters that controlled number of IPs allocated per node:
- MINIMUM_IP_TARGET is the minimum count of IPs to allocate on each node.
- WARM_IP_TARGET is the max count of unused IPs to have on each node.
- WARM_ENI_TARGET controls the number of Elastic Network Interfaces (ENI) attached to an instance.
WARM_IP_TARGET configuration to minimize unused IPs
Initially, we were aggressive and configured WARM_IP_TARGET= 1, which would leave only a single IP in reserve.
When we executed following command on the cluster, the output showed all available and assigned IPs on that node:
The following diagram shows the result of the command:
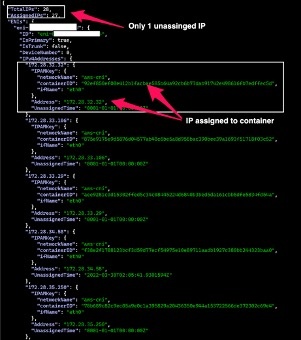
The configuration solved the problem of IP starvation; however, it caused another issue. Since only one additional IP address was reserved (i.e., WARM_IP_TARGET=1 ), whenever multiple pods were scheduled, it required allocation of multiple IPs, which triggered a race condition for IP allocation. The pods had to wait for the VPC CNI plugin to assign more IPs to the worker node. In this duration, we saw errors like – failed to assign an IP address to container and DataStore has no available IP addresses .
The following image shows a snapshot of such error events from kubectl describe pod <pod_name> command:
The following image show logs from /var/log/aws-routed-eni/ipamd.log , on the worker node:
MINIMUM_IP_TARGET configuration to optimize pre-allocation of IPs
To fix this issue we set MINIMUM_IP_TARGET = no of pods expected on each node. When setting this number, you should consider both your workload as well as a number of daemon-sets running within the cluster. Setting WARM_IP_TARGET= 1 and MINIMUM_IP_TARGET= [ expected no of pods] fixed the IP starvation issue.
Challenges while using 100% Spot
The Amazon EKS cluster hosting ORION runs on the
Unavailability of Spot
We had to ensure that in case of unavailability of Spot instances, business was not disrupted. Even though ORION is for non-prod use cases, we couldn’t afford a disruption. We used diverse instance types that had similar CPU, memory configuration (e.g., m5.2xlarge, m5a.2xlarge, m5d.2xlarge, m5ad.2xlarge, and m4.2xlarge). Apart from that, we also used priority expander along with cluster auto-scaler to fall back on on-demand capacity, if Spot capacity was not available.
We used following Kubernetes configuration:
For this approach we created nodegroups for spot and on-demand instances. We decided on a naming convention such that nodegroup with name containing Spot had Spot instances and nodegroup with name containing on-demand had on-demand instances. Priority was configured for each nodegroup using the naming patterns, as shown in the previous example. We gave Spot nodegroup a high priority. It ensured that cluster auto-scaler launched nodes from the Spot nodegroup first. If enough Spot capacity was not available, then the cluster auto scaler falls back to the on-demand nodegroup. We changed the timeout of cluster-autoscaler (i.e., max-node-provision-time) to 10 minutes from the default of 15 minutes.
We are planning to explore
Spot termination handling
We are using self-managed node groups. We needed to gracefully handle Amazon EC2 termination. We used
Minimizing wasted capacity
We were using multiple nodegroup, and each node group was composed of instance types that provided approximately similar capacity. We created xlarge nodegroup composed of m5a.xlarge, m4.xlarge, m5.xlarge, and m5d.xlarge instance types, because each of those provide 4 vCPUs and 16GiB RAM. Similarly, we created another 9xlarge for 9xlarge instance types. We wanted to ensure that we didn’t spin up bigger instances for smaller workloads. We used the least-waste
The following screenshot shows the relevant configuration of cluster auto scaler:
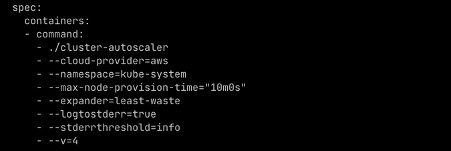
The default value of expander was random , which configured cluster auto-scaler to launch nodes from any of the nodegroup randomly. Apart from this we used, Cloudability monitored the cost of all resources and NewRelic monitored usage of all workloads. We used these two data points to right size resources for each application.
Handling high priority workloads
In our setup, Amazon EKS cluster hosting ORION also hosted our
We addressed this issue by using pod priority. We created high-priority-nonpreemptive pod priority class with a very high priority value and assigned it to pipeline runner pods. This ensured that pipeline pods were always available even if the scheduler had to evict some other pods to accommodate them. While we generally use least-waste capacity expander, in the case of InsufficientInstanceCapacity we switched to priority expander.
Following is the Kubernetes config to create high-priority-nonpreemptive priority class:
The following is the pod configuration that uses high-priority-nonpreemptive priority class:
Conclusion
In this post, we showed you how we scaled host Amazon EKS cluster for ORION from 100 to more than 10,000 pods. ORION has enabled OLX Autos engineers to focus on building business ready features that are critical for OLX Autos expansion into new countries and new businesses. As creating a new environment is easier, engineers don’t have to share environments with each other, which has improved agility and unlocked efficiency. Amazon EKS has helped OLX manage resources efficiently and using a spot first approach has kept the infrastructure cost down.
The following are key learnings from our experience:
- We brought down the application latency to within 50 ms from a peak of 3000ms (~98% improvement), by using FQDN (Domain Name ending with dot) and DNS caching.
- The default behaviour of VPC CNI plugin is optimized for efficiency during pod creation and hence blocks a large number of IP addresses. We optimized the configuration to prevent IP starvation.
-
Spot instances are available at up to 90% discount and are a good fit for the development environment. We used priority expander for reliable capacity, least cost expander to minimize waste and
aws-node-termination-handler (NTH) for graceful node termination. These features make Spot for development a compelling option. - We used priority class to customize pod scheduling and ensure that Amazon EKS never ran out of capacity for high priority workloads.

Nikhil Sharma, OLX
Nikhil Sharma is a Platform Engineering Manager at OLX. In a career spanning over a decade, he has worked on a wide variety of technology landscapes across multiple domains, problems involving network, DNS, TLS, containers, Kubernetes and system performance intrigues him to no limits. He’s an avid reader, loves travelling, is a poet and is a fitness enthusiast. Currently, he’s leading the Platform Team at OLX.

Ravishen Jain, OLX
Ravishen Jain is a Platform Engineer at OLX. His fascination towards containerisation fuelled his finesse in K8s native technologies, he’s an experienced full-stack developer and an active open-source contributor, in the space of designing & building K8s native scalable applications. In his current role, he’s building and managing OLX Autos Internal Developer Platform i.e. ORION.
The mentioned AWS GenAI Services service names relating to generative AI are only available or previewed in the Global Regions. Amazon Web Services China promotes AWS GenAI Services relating to generative AI solely for China-to-global business purposes and/or advanced technology introduction.